From Backend to Frontend: Crafting Llama2-7b Self-hosted Solutions with an API & Chat UI
Adding to the contribution to the open source community, Meta released yet another powerful Large Language Model (LLM) — Llama 2. Llama 2 joins the Llama model family, which has been widely gaining traction amongst researchers and AI practitioners since the release of Llama 1, mainly due to the fact that it is open-source, unlike many others. In fact, even the Llama 2 weights have been made available to researchers to use for non-commercial purposes.
There are multiple base models of Llama 2 available and you can find them listed here. For this tutorial, we will be using the Llama-2–7b-hf, as it is one of the quickest and most efficient ways to get started off with the model. If you visit the meta-llama HuggingFace repo, you will find that each model, with it’s specified number of parameters (eg: 7b), has around 4 versions, namely :
- Llama-2–7b
Meant for next token-generation. In other words, it’s strength is sentence completion. - Llama-2–7b-chat
Meant for back-and-forth dialogue; its forte is in chat applications. - Llama-2–7b-hf
Essentially the Llama-2–7b, optimised for the HuggingFace ecosystem. - Llama-2–7b-chat-hf
Essentially the Llama-2–7b-chat, optimised for the HuggingFace ecosystem.
As you would have observed, any model with the ‘hf’ suffix, indicates that it has been optimised to be used with HuggingFace libraries and modules.
This tutorial helps you deploy the model locally, infer via a GPU and serve the model via an API using FastAPI or a chat interface using Streamlit.
Here are the specs of the computer that we will be deploying the model on :
OS : Ubuntu 22.04 LTS
RAM : 128GB
Storage : 1 TB SSD
CPU : Intel Core i9–11900K
GPU : Nvidia GeForce RTX 3090i
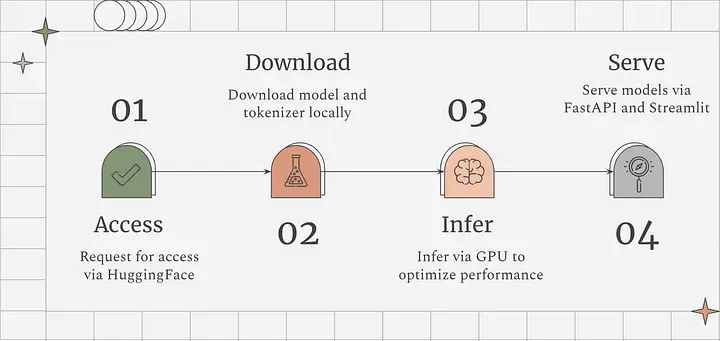
Before we dive in, let’s take a quick look at the visual summary of the steps.
Step 1
The Llama 2 models are gated and we will need to request for access. Since we’re downloading the model via HuggingFace (from now on referred to as HF), we would need to request access via Meta’s request form and on the HF Llama 2 repo. Meta and HF mention that the approvals would take 1–2 days, but in my experience it came through within an hour or so. Once you have been granted access, navigate to the HF Llama 2 repo and you should be able to access the repo now. (Note: Use the same email [email associated with your HF account] in both places Meta’s form and at HF)
Step 2
Head over to your HF profile and navigate to https://huggingface.co/settings/tokens to create an access token which will be used to download the model.
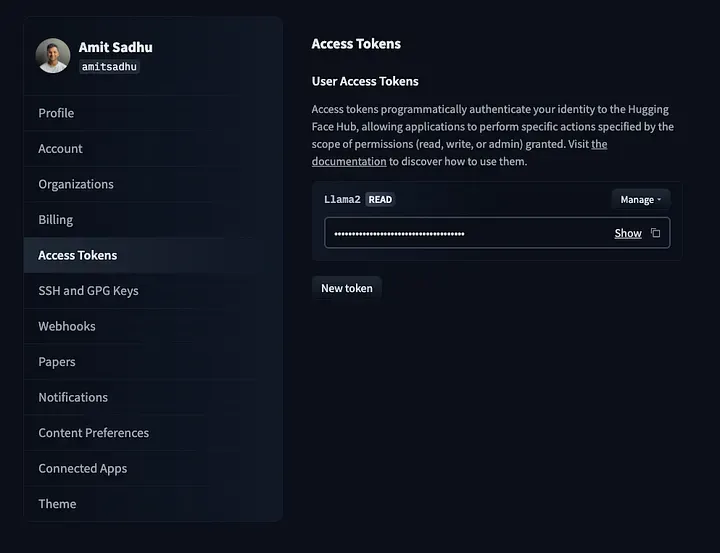
For security measures, assign ‘read-only’ access to the token.
Step 3
On your machine, create a new directory to store all the files related to Llama-2–7b-hf and then navigate to the newly created directory.
$ mkdir l27b
$ cd l27b
Step 4
In the new directory clone the ‘Llama-2–7b-hf’ repo. You would prompted for your HF credentials. Supply your email associated with your HF account and the access token generated in the previous step.
git lfs install
git clone https://huggingface.co/meta-llama/Llama-2-7b-hf
Step 5
Create a virtual environment to install and configure the required dependencies in the newly created directory. After that, activate the environment.
$ virtualenv l27benv
$ source l27benv/bin/activate
Step 6
Once inside the virtual environment install the required dependencies.
pip install transformers torch einops accelerate fastapi uvicorn
Step 7
Create a python script (eg: inference_api.py) to instantiate the model and generate inferences via an API.
Make sure to check and install the required dependencies to utilize your GPU. If you’re not sure on how to check if your GPU is detected or functioning, check out my previous blog — A beginner’s guide to deploying Falcon-7b locally (via CPU or GPU).
There are 2 ways to serve the model via an API :
a) Load the model on the GPU only when the API endpoint is hit.
This approach can be taken when API requests would be sent intermittently, rather than in rapid succession.
import os
from fastapi import FastAPI
from transformers import AutoTokenizer, AutoModelForCausalLM, PreTrainedModel
import transformers
import torch
from accelerate import infer_auto_device_map
from pydantic import BaseModel

#Enter your local directory you want to store the model in
save_path = “local/directory/you/want/to/store/the/model/in”

#Empty cuda cache
torch.cuda.empty_cache()

#Call the model and tokenizer from local storage
local_model = AutoModelForCausalLM.from_pretrained(save_path, return_dict=True, trust_remote_code=True, device_map="auto",torch_dtype=torch.bfloat16).to("cuda")
local_tokenizer = AutoTokenizer.from_pretrained(save_path)

#Define the body of the request
class InputData(BaseModel):
    text: str

app = FastAPI()

#Define the status endpoint
@app.get("/status")
def read_root():
    return {"The Llama2-7b-hf API is healthy. Use the /l27b endpoint to generate inferences"}

#Define the inference endpoint
@app.post("/infer")
#Configure inference generation
def get_prediction(input_data: InputData):
    pipeline = transformers.pipeline(
        "text-generation",
        model=local_model,
        tokenizer=local_tokenizer,
        torch_dtype=torch.bfloat16,
    )
    sequences = pipeline(
        input_data.text,
        temperature = 1,
        max_length=200,
        do_sample=True,
        top_k=1,
        num_return_sequences=1,
        eos_token_id=local_tokenizer.eos_token_id,
    )

 #Display generated text
    for seq in sequences:
        # Remove input text from the generated output
        generated_output = str(seq['generated_text'])
        generated_response = generated_output.replace(str(input_data.text), '').strip()
        return generated_response
**b) Keep the model loaded and continuously running on the GPU
**This approach can be taken when inference speed is of utmost importance. Here, API requests could be sent in a continuous stream and the responses would be comparatively faster. However, do note that this would keep your GPU memory occupied till you offload the model.
import os
from fastapi import FastAPI
from transformers import AutoTokenizer, AutoModelForCausalLM, PreTrainedModel
import transformers
import torch
from accelerate import infer_auto_device_map
from pydantic import BaseModel

#Enter your local directory you want to store the model in
save_path = "local/directory/you/want/to/store/the/model/in"

#Define the body of the request
class InputData(BaseModel):
    text: str

app = FastAPI()

#Define the status endpoint
@app.get("/status")
def read_root():
    return {"The Llama2-7b-hf API is healthy. Use the /l27b endpoint to generate inferences"}

#Define the inference endpoint
@app.post("/l27b")
#Load the model and tokenizer from local storage
def load_prediction(input_data: InputData):
    torch.cuda.empty_cache()
    local_model = AutoModelForCausalLM.from_pretrained(save_path, return_dict=True, trust_remote_code=True, device_map="cuda:0",torch_dtype=torch.bfloat16).to("cuda")
    local_tokenizer = AutoTokenizer.from_pretrained(save_path)

#Configure inference generation
def get_prediction(input_data: InputData):
    pipeline = transformers.pipeline(
        "text-generation",
        model=local_model,
        tokenizer=local_tokenizer,
        torch_dtype=torch.bfloat16,
    )
    sequences = pipeline(
        input_data.text,
        temperature = 1,
        max_length=200,
        do_sample=True,
        top_k=1,
        num_return_sequences=1,
        eos_token_id=local_tokenizer.eos_token_id,
    )

 #Display generated text
    for seq in sequences:
        # Remove input text from the generated output
        generated_output = str(seq['generated_text'])
        generated_response = generated_output.replace(str(input_data.text), '').strip()
        return generated_response
In both the approaches, we are creating two API endpoints which are as follows:
The status API endpoint that can be accessed via the GET method. To know if the model is up and running, we can use the status endpoint for a quick check, instead of making a direct request to the model and generating an inference.
The l27b API endpoint can be accessed via the POST method. It will be used to infer responses from the model.
Step 8
Now you will need to run the uvicorn server which will expose the endpoints we have created earlier.
uvicorn <file_name>:app --host 0.0.0.0 --reload
Here, we have specifically configured to expose our uvicorn server on the server’s IP on port 8000 ie.localhost. (For eg: if your IP is 10.12.34.45, the API endpoints would be exposed via the following URL’s :
> 10.12.34.45:8000/status

> 10.12.34.45:8000/l27b
Ensure to add the following headers to your API when making a request :
Accept : application/json
Content-Type : application/json
Examples
I have used Postman in the examples below — perfect for our use-case in building and testing API’s.
As shown below, the status endpoint uses the GET method.
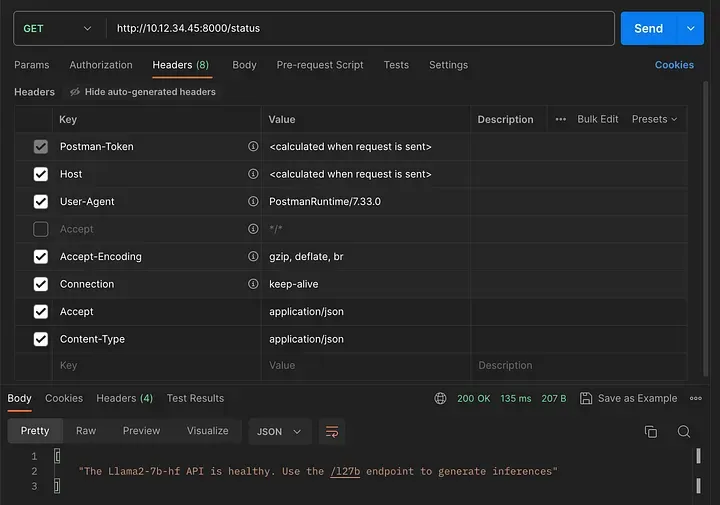
Checking the status API endpoint
The l27b endpoint uses the POST method. You can pass your input prompt via the body of the API request in JSON format for an inference:
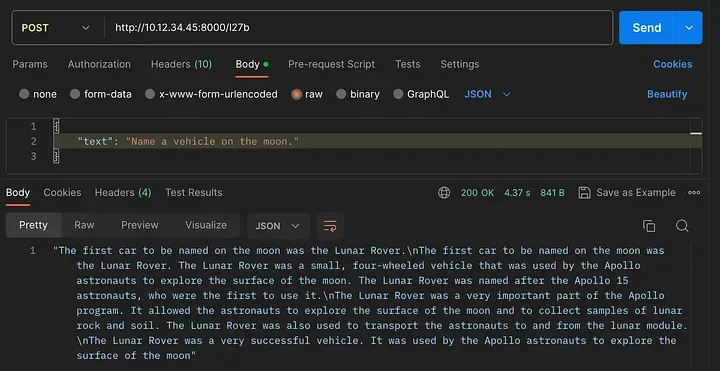
Checking the l27b API endpoint
Step 9
For the chat UI, we would need to install the streamlit library in our l27benv virtual environment.
pip install streamlit
Step 10
After installing the required dependency we would need to create another python script (eg: llama2_chat)
import streamlit as st
from streamlit_chat import message
import requests
import json

#Streamlit config
st.set_page_config(
page_title="Llama 2-7b HF Chat",
page_icon=":robot:"
)
st.header("Llama 2-7b HF Chat 🦙🤗")

#API Request config
API_URL = "http://10.12.34.45:8000/l27b"
headers = {"Content-Type": "application/json", "accept": "application/json"}

#Streamlit session-state variables
if 'generated' not in st.session_state:
    st.session_state['generated'] = []
if 'past' not in st.session_state:
    st.session_state['past'] = []

#Function to make the API request
def query(payload):
    response = requests.post(API_URL, headers=headers, json=payload)
    return response

#Chat interactive components
input_text = st.text_input("You: ","Enter your text", key="input")
send_button = st.button("Send")

#Conversation handling
if input_text and send_button:
    data_payload = {"text" : input_text}
    full_response = query(data_payload)
    output = full_response.json()
    st.session_state.past.append(input_text)
    st.session_state.generated.append(output)
if st.session_state['generated']:
    for i in range(len(st.session_state['generated'])-1, -1, -1):
        message(st.session_state["generated"][i], key=str(i))
        message(st.session_state['past'][i], is_user=True, key=str(i) + '_user')
Step 11
Before running the streamlit app, ensure to have the l27b endpoint up and running as the app will make requests to our self-hosted llama 2–7b instance. After that, execute the following command and the streamlit app should open up in your default browser.
streamlit run llama2_chat.py
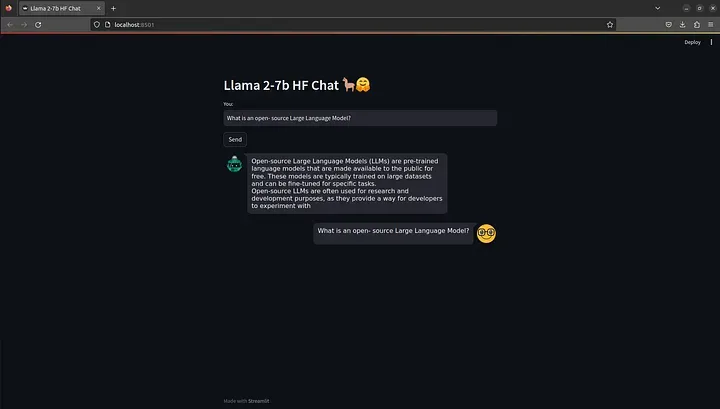
Note : If your focus is on using the model via a chat interface, I would recommend using the Llama-2–7b-chat-hf model.
With this, you’ve come to end of this tutorial. Now you have Llama 2–7b self-hosted and available via an API and a chat interface! 🦙🤗
Happy experimenting!