How to deploy a model from HuggingFace Spaces on AWS using Docker

In this tutorial, I will guide you through the process of deploying a Hugging Face (HF) Spaces model, creating your own HF model repository and a Docker container for your model, pushing it to Docker Hub, and finally running it on an AWS instance with GPU-enabled inferences.
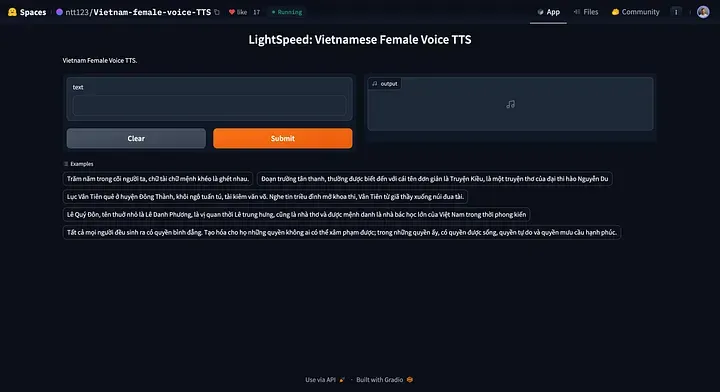
This process involves several steps, each of which is crucial for ensuring your model is deployed securely and efficiently. For this tutorial, we will be using a Vietnamese Text-to-Speech model from https://huggingface.co/spaces/ntt123/Vietnam-female-voice-TTS
Step 1
On your machine, create a new directory to store all the files and then navigate to the newly created directory.
$ mkdir viet-f-tts
$ cd viet-f-tts
Step 2
Clone the model files from Hugging Face Spaces into the newly created directory that you have created locally.
Use the following command the clone the repository:
git clone https://huggingface.co/spaces/ntt123/Vietnam-female-voice-TTS
Step 3
i) Enhance the security of your model deployment by creating a login page.
In the code below, I have added the authenticate function and the auth= keyword argument in the launch() method.
ii) Instruct the gradio app to run on the default network adapter of the server by adding server_name="0.0.0.0" to the launch() method.
vi app.py
import torch  # isort:skip
torch.manual_seed(42)
import json
import re
import unicodedata
from types import SimpleNamespace
import gradio as gr
import numpy as np
import regex
from models import DurationNet, SynthesizerTrn
USERNAME = "<enter the desired username>"
PASSWORD = "<enter the desired password>"
# Define a simple authentication function
def authenticate(username, password):
    return username == USERNAME and password == PASSWORD
title = "LightSpeed: Vietnamese Female Voice TTS"
description = "Vietnam Female Voice TTS."
config_file = "config.json"
duration_model_path = "duration_model.pth"
lightspeed_model_path = "gen_630k.pth"
phone_set_file = "phone_set.json"
device = "cuda" if torch.cuda.is_available() else "cpu"
with open(config_file, "rb") as f:
    hps = json.load(f, object_hook=lambda x: SimpleNamespace(**x))
# load phone set json file
with open(phone_set_file, "r") as f:
    phone_set = json.load(f)
assert phone_set[0][1:-1] == "SEP"
assert "sil" in phone_set
sil_idx = phone_set.index("sil")
space_re = regex.compile(r"\s+")
number_re = regex.compile("([0-9]+)")
digits = ["không", "một", "hai", "ba", "bốn", "năm", "sáu", "bảy", "tám", "chín"]
num_re = regex.compile(r"([0-9.,]*[0-9])")
alphabet = "aàáảãạăằắẳẵặâầấẩẫậeèéẻẽẹêềếểễệiìíỉĩịoòóỏõọôồốổỗộơờớởỡợuùúủũụưừứửữựyỳýỷỹỵbcdđghklmnpqrstvx"
keep_text_and_num_re = regex.compile(rf"[^\s{alphabet}.,0-9]")
keep_text_re = regex.compile(rf"[^\s{alphabet}]")

def read_number(num: str) -> str:
    if len(num) == 1:
        return digits[int(num)]
    elif len(num) == 2 and num.isdigit():
        n = int(num)
        end = digits[n % 10]
        if n == 10:
            return "mười"
        if n % 10 == 5:
            end = "lăm"
        if n % 10 == 0:
            return digits[n // 10] + " mươi"
        elif n < 20:
            return "mười " + end
        else:
            if n % 10 == 1:
                end = "mốt"
            return digits[n // 10] + " mươi " + end
    elif len(num) == 3 and num.isdigit():
        n = int(num)
        if n % 100 == 0:
            return digits[n // 100] + " trăm"
        elif num[1] == "0":
            return digits[n // 100] + " trăm lẻ " + digits[n % 100]
        else:
            return digits[n // 100] + " trăm " + read_number(num[1:])
    elif len(num) >= 4 and len(num) <= 6 and num.isdigit():
        n = int(num)
        n1 = n // 1000
        return read_number(str(n1)) + " ngàn " + read_number(num[-3:])
    elif "," in num:
        n1, n2 = num.split(",")
        return read_number(n1) + " phẩy " + read_number(n2)
    elif "." in num:
        parts = num.split(".")
        if len(parts) == 2:
            if parts[1] == "000":
                return read_number(parts[0]) + " ngàn"
            elif parts[1].startswith("00"):
                end = digits[int(parts[1][2:])]
                return read_number(parts[0]) + " ngàn lẻ " + end
            else:
                return read_number(parts[0]) + " ngàn " + read_number(parts[1])
        elif len(parts) == 3:
            return (
                read_number(parts[0])
                + " triệu "
                + read_number(parts[1])
                + " ngàn "
                + read_number(parts[2])
            )
    return num

def text_to_phone_idx(text):
    # lowercase
    text = text.lower()
    # unicode normalize
    text = unicodedata.normalize("NFKC", text)
    text = text.replace(".", " . ")
    text = text.replace(",", " , ")
    text = text.replace(";", " ; ")
    text = text.replace(":", " : ")
    text = text.replace("!", " ! ")
    text = text.replace("?", " ? ")
    text = text.replace("(", " ( ")
    text = num_re.sub(r" \1 ", text)
    words = text.split()
    words = [read_number(w) if num_re.fullmatch(w) else w for w in words]
    text = " ".join(words)
    # remove redundant spaces
    text = re.sub(r"\s+", " ", text)
    # remove leading and trailing spaces
    text = text.strip()
    # convert words to phone indices
    tokens = []
    for c in text:
        # if c is "," or ".", add <sil> phone
        if c in ":,.!?;(":
            tokens.append(sil_idx)
        elif c in phone_set:
            tokens.append(phone_set.index(c))
        elif c == " ":
            # add <sep> phone
            tokens.append(0)
    if tokens[0] != sil_idx:
        # insert <sil> phone at the beginning
        tokens = [sil_idx, 0] + tokens
    if tokens[-1] != sil_idx:
        tokens = tokens + [0, sil_idx]
    return tokens

def text_to_speech(duration_net, generator, text):
    # prevent too long text
    if len(text) > 500:
        text = text[:500]
    phone_idx = text_to_phone_idx(text)
    batch = {
        "phone_idx": np.array([phone_idx]),
        "phone_length": np.array([len(phone_idx)]),
    }
    # predict phoneme duration
    phone_length = torch.from_numpy(batch["phone_length"].copy()).long().to(device)
    phone_idx = torch.from_numpy(batch["phone_idx"].copy()).long().to(device)
    with torch.inference_mode():
        phone_duration = duration_net(phone_idx, phone_length)[:, :, 0] * 1000
    phone_duration = torch.where(
        phone_idx == sil_idx, torch.clamp_min(phone_duration, 200), phone_duration
    )
    phone_duration = torch.where(phone_idx == 0, 0, phone_duration)
    # generate waveform
    end_time = torch.cumsum(phone_duration, dim=-1)
    start_time = end_time - phone_duration
    start_frame = start_time / 1000 * hps.data.sampling_rate / hps.data.hop_length
    end_frame = end_time / 1000 * hps.data.sampling_rate / hps.data.hop_length
    spec_length = end_frame.max(dim=-1).values
    pos = torch.arange(0, spec_length.item(), device=device)
    attn = torch.logical_and(
        pos[None, :, None] >= start_frame[:, None, :],
        pos[None, :, None] < end_frame[:, None, :],
    ).float()
    with torch.inference_mode():
        y_hat = generator.infer(
            phone_idx, phone_length, spec_length, attn, max_len=None, noise_scale=0.0
        )[0]
    wave = y_hat[0, 0].data.cpu().numpy()
    return (wave * (2**15)).astype(np.int16)

def load_models():
    duration_net = DurationNet(hps.data.vocab_size, 64, 4).to(device)
    duration_net.load_state_dict(torch.load(duration_model_path, map_location=device))
    duration_net = duration_net.eval()
    generator = SynthesizerTrn(
        hps.data.vocab_size,
        hps.data.filter_length // 2 + 1,
        hps.train.segment_size // hps.data.hop_length,
        **vars(hps.model),
    ).to(device)
    del generator.enc_q
    ckpt = torch.load(lightspeed_model_path, map_location=device)
    params = {}
    for k, v in ckpt["net_g"].items():
        k = k[7:] if k.startswith("module.") else k
        params[k] = v
    generator.load_state_dict(params, strict=False)
    del ckpt, params
    generator = generator.eval()
    return duration_net, generator

def speak(text):
    duration_net, generator = load_models()
    paragraphs = text.split("\n")
    clips = []  # list of audio clips
    # silence = np.zeros(hps.data.sampling_rate // 4)
    for paragraph in paragraphs:
        paragraph = paragraph.strip()
        if paragraph == "":
            continue
        clips.append(text_to_speech(duration_net, generator, paragraph))
        # clips.append(silence)
    y = np.concatenate(clips)
    return hps.data.sampling_rate, y

gr.Interface(
    fn=speak,
    inputs="text",
    outputs="audio",
    title=title,
    examples=[
        "Trăm năm trong cõi người ta, chữ tài chữ mệnh khéo là ghét nhau.",
        "Đoạn trường tân thanh, thường được biết đến với cái tên đơn giản là Truyện Kiều, là một truyện thơ của đại thi hào Nguyễn Du",
        "Lục Vân Tiên quê ở huyện Đông Thành, khôi ngô tuấn tú, tài kiêm văn võ. Nghe tin triều đình mở khoa thi, Vân Tiên từ giã thầy xuống núi đua tài.",
        "Lê Quý Đôn, tên thuở nhỏ là Lê Danh Phương, là vị quan thời Lê trung hưng, cũng là nhà thơ và được mệnh danh là nhà bác học lớn của Việt Nam trong thời phong kiến",
        "Tất cả mọi người đều sinh ra có quyền bình đẳng. Tạo hóa cho họ những quyền không ai có thể xâm phạm được; trong những quyền ấy, có quyền được sống, quyền tự do và quyền mưu cầu hạnh phúc.",
    ],
    description=description,
    theme="default",
    allow_flagging="never",
).launch(debug=True,auth=authenticate,server_name="0.0.0.0")
Step 4
After you have made the changes, create a new model repository and push all your files to the repo.
This step specifically ensures that the model artefacts are always accessible to you, even if the model is no longer available on HF spaces.
Step 5
Before you begin with Docker, make sure you have it installed on your machine. Once installed, you'll need to create a new repository on Docker Hub. This is where your Docker image will be stored.
a) Sign up or log in to Docker Hub — https://hub.docker.com/. b) Navigate to Repositories and click on the "Create Repository" button. c) Provide a name for your repository and choose the visibility (public or private).
Step 6
In this step, let's create a Dockerfile that specifies the environment, dependencies, and commands to containerize and run our model. The Dockerfile is the main config file of our container. Here's the structure of the Dockerfile:
# Use an official Python runtime as a parent image
FROM python:3.11

# Set the working directory in the container
WORKDIR /app

# Copy the current directory contents into the container at /app
COPY . /app

# Install any needed packages specified in requirements.txt
RUN pip install --no-cache-dir -r requirements.txt

# Make port 7860 available to the world outside this container
EXPOSE 7860

# Run app.py when the container launches
CMD ["python", "app.py"]
Note: The default port of HF Spaces is 7860
Step 7
After creating the Dockerfile, build the Docker image using the following command:
(Ensure you are in the same directory where the Dockerfile was created when running the docker build command)
docker build -t <dockerhub-username>/<repository-name>:<tag> .
Now, push the built image to your Docker Hub repository:
docker push <dockerhub-username>/<repository-name>:<tag>
Step 8
Set up an GPU-enabled AWS instance by doing the following:
a) Log in to your AWS Management Console and launch a new EC2 instance. b) Choose an instance type that supports GPU (e.g. g4dn.xlarge) and proceed with the instance setup. (Note: The g4dn.xlarge instance has sufficient compute for this model. However, you would have to determine the compute resources required based on your model and inference patterns.) c) Ensure you have the appropriate IAM roles attached for EC2 access and other necessary services.
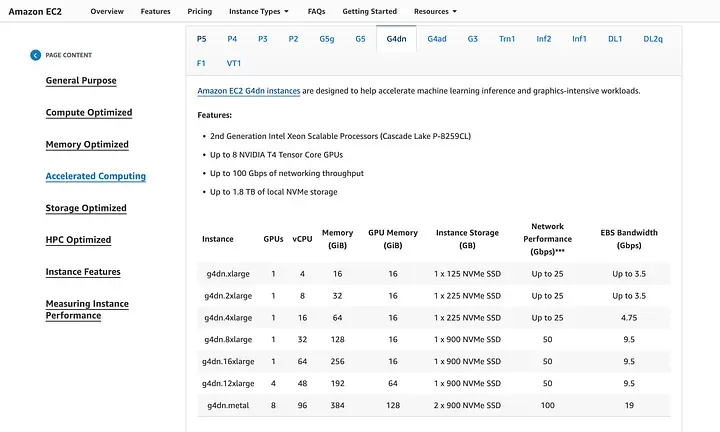
https://aws.amazon.com/ec2/instance-types/?p=itt#accelerated-computing
Step 9
After setting up your instance, connect to it via SSH to install the required GPU drivers. For this EC2 instance template — we will have to follow the instructions given in these AWS Docs.
Note: Without this driver installation and configuration, Docker will not be able to utilize GPU compute for faster inference speeds.
Step 10
After ensuring GPU functionality, install Docker on the newly deployed AWS instance.
sudo apt-get update
sudo apt-get install docker.io
Once docker is installed, pull the docker image from docker hub onto the server.
docker pull <your-dockerhub-username>/<repository-name>:<tag>
Step 11
Run the model, and use the --gpus all flag to enable GPU access (ensure your Docker version supports this):
docker run --gpus all -p 7860:7860 <your-dockerhub-username>/<repository-name>:<tag>
Step 12
Finally, you need to configure the security groups (set up an inbound rule) of your AWS instance to allow traffic to the port your model is running on (e.g., port 7860).
- Go to the EC2 dashboard and select "Security Groups."
- Find the security group associated with your instance and edit the inbound rules.
- Add a rule to allow TCP traffic on port 7860 from your desired source or
0.0.0.0(ie. any IPv4 address). - Access your model via
<AWS EC2 instance IP>:7860(eg: If your EC2 instance IP is 12.34.56.78, the URL would be http://12.34.56.78:7860)
And there you have it — your HuggingFace model now brilliantly deployed on AWS and containerized with GPU inferences!
Conclusion
Deploying a model with Docker and running it on an AWS instance with GPU support involves several technical steps, from preparing your model for deployment to ensuring it can be accessed securely. This tutorial is applicable across any Hugging Face model and Hugging Face space, taking advantage of Docker's containerization and AWS's compute resources for a scalable and robust model deployment.